Showing posts with label Food - Misc. Show all posts

Monday, January 31, 2011

Time Saving Hamburger

 Starting the browning process...
 Draining off the fat...
 Completely browned
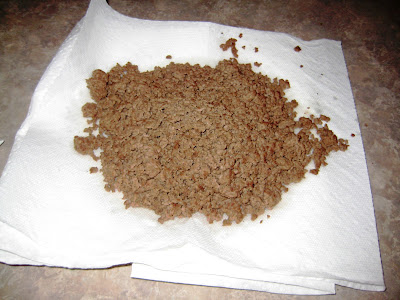
 Let the paper towels absorb the remaining grease
 Work to get the rest of it out...
 Yuk... that's all I can say... eeewww!
One happy mommy!
If you are like me... I don't make the time... nor do I know on a daily basis what schedule Josh is going to be on... if he will be home for dinner... if Kendra or my parents will be eating with us... so to think that far in advance and actually remember to take hamburger out of the freezer before I leave for work is impossible for me.  My mom taught me this trick back several years ago... brown all of your hamburger at once.  That way you only have the smell once... the extra dishes once... and I can "fly by the seat of my pants" and still cook something fast and easy for my family on a moments notice.  Josh's favorite is Hamburger Helper Cheese Macaroni... (Kendra is going to love that) - but it works for Spaghetti - Tater Tot Casserole - BBQ - Lasagna - Tacos... just zap in the microwave and you are off to the races.  Every 6 months I get an extra check at work... so I try to buy my meat then. I bought 30 pounds of extra lean (I think it was 93%) and I still got a ton of fat off of it. So for every 7.5 pounds I got a whole glass of fat and gunk skimmed off.  I brown it in a skillet (I think the heat stays more even and it doesn't burn... when I do it on the stove top I have to watch it every second).  As the meat is browning I tip the pan so the grease runs to one side and then I spoon it into a glass. After it's completely browned  I have several plates with layered paper towels that a put the browned meat on to finish draining.  After it's cooled some I take more papers towels and using both hands (in the pic I am only using one... I had to use the other to take the pic) and really make sure to get all of the grease out of the meat.  Make sure to add new paper towels each time you start a new batch. I then pour it into freezer bags.  It's usually just a little over a pound in each one... then I make sure to get all of the air out of the bag and seal it up good and tight... then off to the freezer.  After 4 hours... I was ready to be done... but I know the time and energy it is going to save in the long run... Bon Appetit!

Tuesday, May 11, 2010

Jazz Jello

Jazz Jello had been a tradition for Josh and I through the years during the NBA playoffs... Since he and I are "starting over" again...  I figured we needed to go back to some of our old traditions.

The Jazz were down to the Lakers 3-0 in the series... and I was running out of time... Here is the finished product. I was going for the Purple - Blue color scheme then thought about going old school - that's going to be new school again... but I didn't have any green jello... go figure!

The recipe for the jello is super simple... pick 3 of your favorite flavors (in this case... I went for color) Use the small boxes I think they are 3 oz. Make sure to use the same flavor (or color) in bowl 1 and and in bowl 2

Bowl 1
Dump jello package in bowl  - add 3/4 cup boiling water. Stir - and add 3/4 cup cold water - stir again. Pour the jello into a clear dish and put in refrigerator to set.

Bowl 2
Dump jello package into bowl - add 1/2 cup boiling water. Stir... then add 1/2 cup cold water, stir in 1/2 cup yogurt any flavor (I usually use vanilla). It will be a lighter version of the plain jello you just put in fridge. When first layer is set... add the jello from bowl 2 and return to refrigerator to set... depending on how much time you have the freezer can be a big help!  It ends up taking 1/2 of time!

Continue with alternating Bowl 1 and Bowl 2 until you have all 6 packages layered into glass container. Serve with a dollop of Cool-Whip.
Enjoy!

Thursday, March 18, 2010

Rainbow Cake

I had to take a pic of our rainbow cake...
it turned out dang cute too...
Family... Some Uno-Spin and a tasty rainbow cake.
Happy Clover Day!

Sunday, March 14, 2010

Rainbow Cupcakes

Two of the six colors we used...
Kendra carefully spooning in the colors on top of each other...
Josh even got in on the "action"... he's even smiling!
 
The final cupcake - cream cheese frosting on top!
Even the liner came out looking like a rainbow!

I love 
RAINBOWS...
I had seen on other blogs the cute rainbow cupcakes and thought...
we should make some too...
Kendra and I started... and with a little coaxing
Josh soon joined the fun...
did I mention... they are super yummy tasting too!
Happy Clover Day!